Wednesday, February 29, 2012

Washer and Dryer Covers


I have wanted to make these for a while now! But, I have had a few mishaps with the washers a dryers I owned and they had to be replaced! So now that I have my new washer and dryer it was finally time to tackle this task! I got the idea from my mom. Who, like me, HATES messes! These covers really help eliminate scratches, spills and whatever else might try and take a whack at your washer and dryer! 

What you will need:

2 yards of fabric
2 towels 
Thread
and a sewing machine! 


Now I just measure my stuff by eyeing it and it usually works out. But you can measure your washer and dryer and figure out what size you will need to cut your towel! 

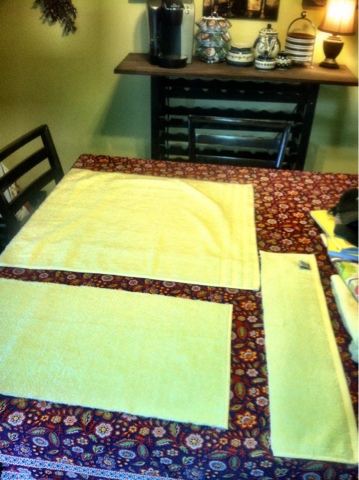
I cut mine into 3 pieces. The bigger one on top is the width and then the bottom piece is for length and the strip is to help with the "length piece". 


You will cut the strip to be the same length as the "bottom" piece and sew those together first! 


Then you will sew the "top" to the bottom, that has now been altered, so both pieces are the same size length wise! 


Here id an idea of what it will look like win it's all sewn together! 

Once the towel is the size you want it. Cut out the fabric. You shouldn't have to cut the fabric into a bunch of pieces. It should just be one piece. You will lay the fabric on top of the towel and pin it together . Make sure you sew it with the towels pretty side facing the pattern on the fabric (the picture above shows what side of the towel and fabric that should be facing each other.) You are sewing it inside out, and then you will turn it right side out when finished. 

When you are sewing the towel and the fabric together make sure to leave a opening to where you can turn

your cover right side out! 


Once its sewn and right side out you can add a border to your cover! Its really simple! Just sew along the inside about, a inch and a half. Sew all the way around! Thats it! 
Don't forget to hand sew the opening you left to pull your cover right side out!!! 


The Square Table Cloth

My husband and I decided to buy one of those square pub like tables that are so hip right now. Of course, this was not knowing I would NEVER be able to find a table cloth that fits it! So, to rebel against this "no square table cloths" extravaganza, I'm taking matters into my own hands! I am altering a oblong table cloth I found at Williams Sonoma for $20.00! It's absolutely beautiful and has that pop of color I need in my kitchen! Here's what I did:


First: I folded up the longer edges to meet in the middle. 
This way I could keep everything even without using a ruler or measuring tape! 


Second:
I brought my fold back, trying to make sure it was all even. I then pinned down my fold. 


Here is a close up of the fold. It didn't match up perfectly, but I didn't mind! 


I then sewed along the folds. There will be two folds on each side, one one top and one underneath. I went ahead and sewed along both folds because I wanted to add some depth. But, you don't have to sew along both folds if you don't want to!

I now have a beautiful table cloth, that only coast me $20.00 (because it was on sale!) and it fits perfectly on my square table! 


Friday, February 17, 2012

Home Made Egg Rolls and Sweet and Sour Chicken


This is one of my FAVORITE dishes my mom makes! Its so yummy! 


For the Egg Rolls:

2 lbs of ground beef or turkey browned with 1/2 chopped onion. 

Brown the meat and onion together and then place aside in a dish.

Then:

2 bags of slaw and 1/2 head of chopped cabbage. 

Mix in 2 cans of mixed veggies ( she uses the one with baby corn and sprouts in the Asian section.) 

Steam the cabbage and slaw mix in the same pan you browned the meat and onion. Add 1/4 cup of water, 3tbs of soy sauce, salt and pepper and one or two dashes of red pepper and 3tbs of sugar. 

Steam til done then add the beef and onions back in the pan. 

She usually wraps the mixture in egg roll wrappers, (you can find these at any grocery store) But her store was out. So, she used wan-ton wrappers in the picture! 

You will need to wet the edges of the wrappers to make them stick together. 

add about 1tsp or more of the mixture and roll up if using a egg roll wrapper. If using the wan-ton wrappers add another sheet and roll the edges. 

Deep fry them for about 4 minutes on each side! 


Sweet and Sour Chicken:

1 (8 ounce) can pineapple chunks, drained (juice reserved) 
The juice of one orange
1/4 cup cornstarch
1 3/4 cups water, divided
3/4 cups sugar
3/4 cup brown sugar
1/2 cups distilled white vinegar
8 skinless, boneless, chicken breast halves- cut into 1 inch cubes
2 1/4 cups self-rising flour
2 Tbs vegetable oil
2 Tbs cornstarch 
1/2 tsp salt
1/4 tsp ground white pepper
1egg
1 1/2 cups water
1 quart vegetable oil for frying 


Directions:

In a saucepan, combine 1 1/2 cups water, sugar, vinegar, reserved pineapple juice, and juice of one orange . Heat to boiling. Turn off heat. Combine 1/4 cup cornstarch and 1/4 cup water; slowly stir into saucepan. Continue stirring until mixture thickens.

Combine flour, 2 tablespoons oil, 2 tablespoons cornstarch, salt, white pepper, and egg. Add 1 1/2 cups water gradually to make a thick batter. Stir to blend thoroughly. Add chicken pieces, and stir until chicken is well coated.
Heat oil in skillet or wok to 360 degrees F (180 degrees C). Fry chicken pieces in hot oil 10 minutes, or until golden. Remove chicken, and drain on paper towels.
When ready to serve, put pineapple chunks, and cooked chicken pieces on a platter. Pour hot sweet and sour sauce over top.


Kids Owl Pillow


I have been wanting to make my son something special from "mom" for a while now! SO I finally came up with an idea! An owl pillow for my little guy! 

I didn't have a patter to go off of, I just kind of winged it! 

If you want to give this owl a try please do! It isn't too hard and I have a few pictures to help you out! 
Maybe later down the road I will draw up my own pattern to share with you all! 

Here is a very messy "How-to" 

I used felt for my owls head. I drew a out-line of how large I wanted his head to be. 

Then with my striped fabric I lined up the bottom and drew an outline of his body. 

I then cut the pieces out and pinned the top to the top and the bottom to the bottom leaving what would be the "middle" of the owl open. You can go ahead a sew the top and bottom. But do not sew them together yet. 


Next I cut out the wings! 


Here you can see the "pattern" of the wing! When I cut out the wing my fabric was folded

in half and in half again. This help with 
straight lines. 


~I don't have a picture for this but I also cut pieces of felt to place in between the wings so that they would be a little more stiff~ 

Once I had all the wings cut out and sewn, I placed my smaller wing on my larger wing and sewed them together on the machine. 


Once the wings were together you sew them on to the "head" of the owl. 

I didn't have a specific place to put them I just eyed it and put the wings on the owls sides. 

When you sew the wings to the "head" you want to sew them to the outside of the owl and you want the wings to be pointing up to the ears. 

Once the wings are sewn on you will turn the top back inside out and tuck the wings in to the ears. 

You will then pin the bottom of the owl to the top of the owl. You will want to leave about 1 1/2 inch opening so you can turn you owl right side out and stuff it. 

Once its all sewn, except for the 1 1/2 inch opening and you have it right side out. You will sew on the eyes and mouth. 

Once that is done stuff the owl and sew up the 1 1/2 opening. 


Its really simply and I hope my Messy directions make a little sense! I am making another one soon and I will make sure to draw out a pattern and make it available! 


~Simplicity!


Tuesday, February 7, 2012

Chocolate Cake with Mocha Icing


Last Sunday my family made a wonderful homemade chocolate cake with wonderful mocha icing! It was divine and I wanted to share the recipe! 

You can use any desired chocolate cake recipe. Here is the one my family used:

Chocolate Cake:
 2c all purpose flour               
1 1/2 cup sugar                   
3/4 c cocoa powder            
1 t baking soda                
1/2 t baking powder          
1/4 t salt                   
1 1/2 sticks butter, softened        
3 large eggs  
1 cup water               
1 1/2 t. vanilla 

1. Heat oven to 350. Grease and flour 2, 8 inch round cake pans. I like to cut partchment paper to fit the bottom of my pans and lay that down before I grease and flour.
2. For the cake:  Beat butter, sugar, eggs, and vanilla.  When smooth add dry ingredients and water.  Beat for 3 minutes and divide batter evenly between the 2 pans.

Bake the cakes for 25-30 minutes and let them cool for about an hour before frosting! 


Butter Cream Frosting:
2-stick butter, softened
1T vanilla extract
1/8 t salt
2 pounds powdered sugar
1/2 c strong brewed coffee
1/2 c cocoa powder
Garnish with cocoa powder and powdered sugar

*** Note to readers, this is not a original recipe.*** 


Sunday, February 5, 2012

Fried Sweet Potatoes


You will need:

2 Sweet potatoes
Salt
Peanut oil

Cut your sweet potatoes about 1/8 inch think or thinner if you want crispier chips.
Just palace in fryer or frying pan with peanut oil and fry for about 5 min.
Place on paper towel Bd sprinkle with sea salt. Simple!

Hawaiian Chicken Wings


You will need:

Already cut chicken wings

Peanut oil

Dry ingredients:
flour
Salt
Pepper


Sauce:
2 cups of sugar
2 cups of soy sauce
1 bulb green onion ( to included some of the green) minced well.
3 Tbs minced garlic


You cover your chicken wings in dry ingredients. Fry in a fryer or frying pan until done ( about 8 to 10 minutes)

Once done immediately place into sauce mixture. Stir them around so they are fully coated in sauce. Leave in sauce for 5 minutes. Then remove wings and serve! Simple!